The contouring stick has become one of my absolute favorite tools. Contouring sticks help us effortlessly sculpt a flawless, defined face. Whether you’re trying to highlight high cheekbones, slim down your face, or create a more defined nose, a contouring stick can do it all. I’ll walk you through the steps of using a contouring stick, tips for choosing the right one, and how to use it effectively to achieve a stunningly sculpted look. Let’s dive in!
1. What is a Contouring Stick?
A contouring stick is a makeup product designed to define and sculpt the facial features. It typically comes in a stick form and has a creamy or buttery texture that makes it easy to apply on targeted areas of the face to create shadows and highlight specific features, thus enhancing the overall facial structure. Contouring sticks usually come in two shades: a darker shade for contouring (to create shadows) and a lighter shade for highlighting (to bring attention to the high points of the face).
2. How to Use a Contouring Stick: Step-by-Step Guide
1. Prep Your Skin: Start with a Base
Before using the contouring stick, it’s essential to apply your base makeup first. Begin with cleansing and moisturizing, followed by primer to ensure the makeup adheres to your skin and lasts longer. Then, apply foundation or BB cream to even out your complexion, and use concealer to cover blemishes. A smooth base is crucial for the contouring process, as it allows the contouring stick to blend effortlessly and gives your face a flawless finish.
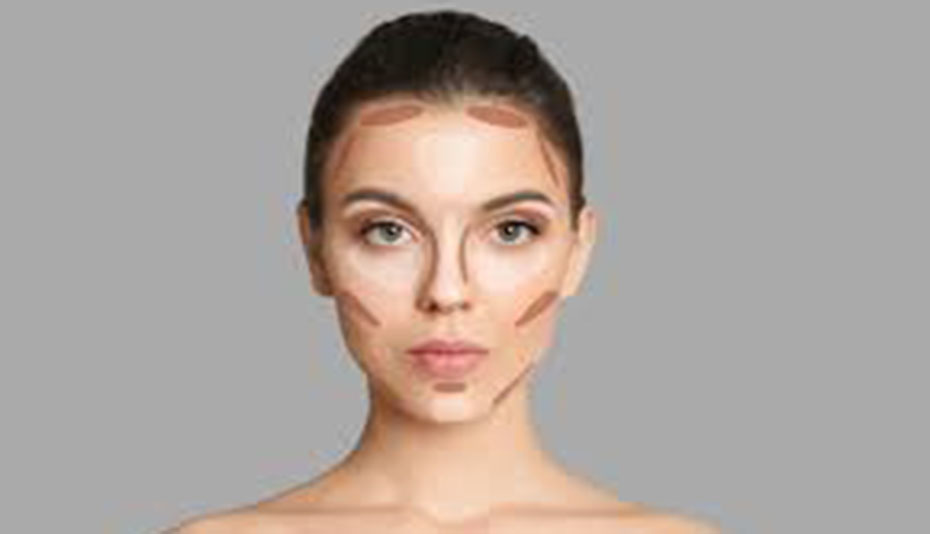
2. Using the Dark Contour Stick
The first step in using the contouring stick is to apply the dark contour shade to create shadows on the face. Here’s how to do it:
- Under the Cheekbones: Draw a line under your cheekbones to define them. This helps to lift the cheekbones and create a more sculpted look. Blend it in for a natural shadow.
- On the Sides of Your Forehead: Apply the contour along both sides of the forehead to make your face appear slimmer. This is especially helpful if you have a larger forehead, as it can make it look smaller.
- Along the Jawline: Apply the contour under the chin and along the jawline to create a more defined, sharp jaw. This can make your face appear more angular and sculpted.
- On the Sides of Your Nose: If you want to make your nose appear slimmer, use the contour stick along the sides of your nose. Blend it in gently to create the illusion of a more refined nose shape.
3. Using the Light Highlighting Stick
Once the contouring is done, it’s time to use the lighter highlight shade to accentuate the high points of your face, adding dimension and bringing light to specific areas. Here’s where to apply the highlight:
- Center of Your Forehead: Apply the highlighter in the center of your forehead to brighten up the area and create the illusion of a more prominent, rounded forehead.
- Above Your Eyebrows: Apply the highlighter just under the brow bone. This helps to open up the eyes and adds depth to the brow area.
- Top of the Cheekbones: Apply the highlighter above the contour under your cheekbones. This will accentuate your cheekbones and give your face a more lifted look.
- Down the Bridge of the Nose: To create the illusion of a higher nose bridge, lightly apply highlighter down the center of your nose.
- Chin and Cupid’s Bow: Apply highlighter to the center of your chin and the top of your upper lip (the Cupid’s bow). This adds a natural glow to these areas, making them stand out.
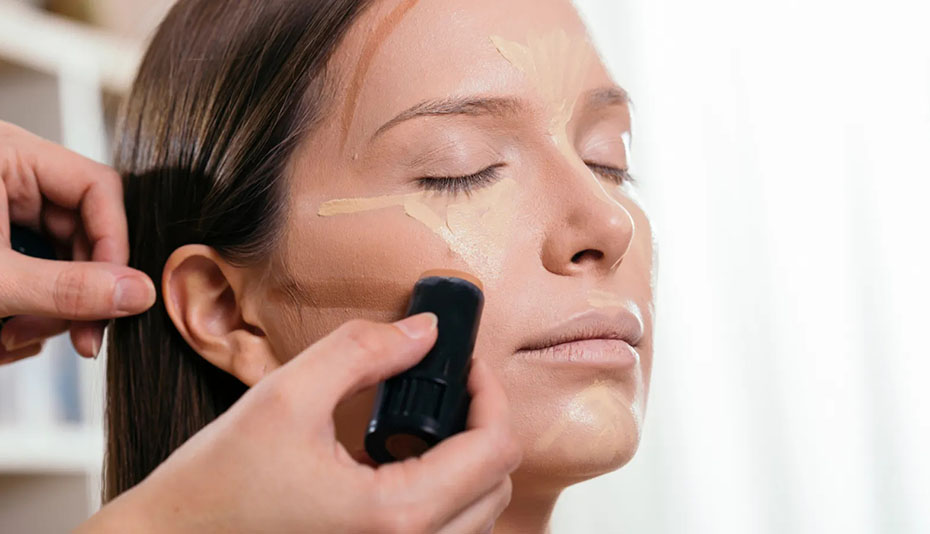
4. Blend Everything In
After applying both the contour and highlight, the most crucial step is to blend. Use a makeup sponge or a contour brush to gently blend the products into your skin. This will ensure the contour and highlight blend seamlessly and that there are no harsh lines. Take your time and blend in circular motions, paying special attention to areas where the contour and highlight meet to make everything look natural.
3. How to Choose the Right Contouring Stick for You
Selecting the right contouring stick can make a world of difference in achieving a flawless sculpted look. Here are some tips for choosing the best contouring stick for your needs:
1. Pick a Shade That Matches Your Skin Tone
Contouring sticks come in various shades, so it’s important to select a color that complements your skin tone. For darker skin tones, go for a rich chocolate or deep brown contour shade, while fairer skin tones should opt for a lighter, more neutral contour color. If you’re unsure, you can always try a contour stick in the middle range of shades for a more subtle effect.
2. Choose the Right Texture for Your Skin Type
Contouring sticks generally come in two textures: cream or powder. Cream-based contour sticks are great for dry or dehydrated skin, as they blend easily and provide moisture. On the other hand, powder contour sticks or powders are more suited for oily or combination skin types because they are lightweight and matte.
3. Look for Long-lasting Formulas
Make sure to choose a contour stick with a long-lasting formula, especially if you have a busy day ahead or are attending an event. Many contour sticks are designed to stay in place for hours without smudging or fading, which is essential for keeping your look fresh throughout the day.
4. Check the Ingredients
For those with sensitive skin, it’s important to choose a contour stick with gentle ingredients. Look for products that are free from harsh chemicals or artificial fragrances. Some high-end brands also offer contour sticks with added skin-loving ingredients such as vitamin E and aloe vera, which can help to hydrate and soothe the skin.
4. Recommended Contouring Stick Brands
- Fenty Beauty by Rihanna
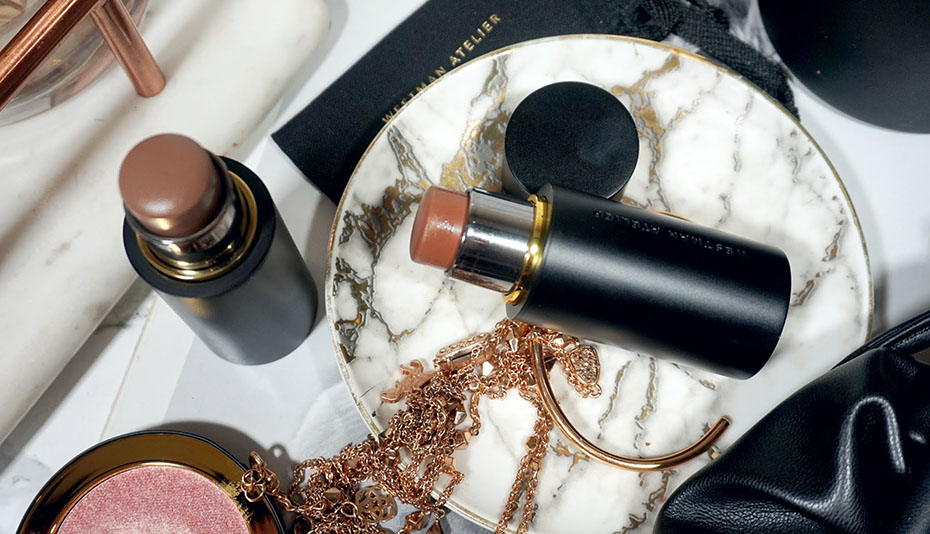
The Match Stix by Fenty Beauty is one of my all-time favorite contouring sticks. Its smooth texture blends seamlessly into the skin, and it comes in a wide range of shades that work for a variety of skin tones. The product provides excellent coverage and can be used for both contouring and highlighting, making it a versatile choice for any makeup enthusiast.
- Anastasia Beverly Hills
Anastasia Beverly Hills’ Contour Stick Collection is perfect for anyone looking to achieve sharp, sculpted features. The smooth, creamy texture allows for easy application, and the shades are designed to suit a wide range of skin tones. If you’re after a high-definition, photo-ready contour, this is the product for you.
- Charlotte Tilbury
Charlotte Tilbury’s Hollywood Contour Wand is a fan favorite among makeup artists and beauty influencers. This liquid contour stick has a lightweight formula that blends beautifully into the skin and leaves a flawless finish. It’s perfect for those who love a glowing, naturally contoured look, and it works wonderfully for everyday wear.
- Tarte Cosmetics
Tarte’s Double Duty Beauty Contour Stick is a multi-purpose product that can be used for both contouring and highlighting. The creamy texture makes it easy to blend, and the shades are ideal for creating a natural, soft contour. This stick is perfect for those who are new to contouring or anyone who wants an easy-to-use product.
Contouring sticks are an essential tool for achieving a well-defined, sculpted face. Whether you’re a beginner or a makeup pro, a contouring stick can make your makeup routine much easier and help you create a more chiseled, defined look. Be sure to choose the right contouring stick for your skin type and tone, and don’t forget to blend it well for a flawless finish. With these tips and product recommendations, you’ll be well on your way to mastering the art of contouring and highlighting!